
How to Add Custom Code Blocks to Articulate Rise Courses
Published on by Team @ Slate eLearning
Adding custom code snippets to Articulate Rise courses opens up endless possibilities for customization and interactivity. Whether you want to add custom styling, interactive elements, or enhanced functionality to specific blocks in your Rise course, the ability to target individual blocks with custom JavaScript and CSS code transforms what's possible in your eLearning content.
Quick Solution: Use RiseOverride to add custom code snippets that target any block in your Articulate Rise course using Block IDs. Simply copy a Block ID or Block ID Selector and write custom JavaScript or CSS to enhance that specific element—completely free and with built-in tools to make it easy.
Why Custom Code Snippets Matter in Rise
When you need to customize specific blocks in your Articulate Rise course, custom code snippets allow you to:
- Target specific blocks: Use Block IDs to apply code to individual course elements
- Add interactivity: Create custom JavaScript interactions for any block
- Apply custom styling: Use CSS to modify the appearance of specific blocks
- Enhance functionality: Add features that aren't available in standard Rise
- Create consistent branding: Apply custom styles across multiple blocks
Native Rise Limitations for Custom Code
Articulate Rise provides a solid foundation for eLearning content, but it has limitations when you need custom functionality:
- Limited styling options: Basic formatting doesn't allow for advanced visual customization
- No custom JavaScript: Can't add interactive elements or custom behaviors
- Fixed block behaviors: All blocks work the same way with no customization options
- Branding constraints: Difficult to match specific brand guidelines or visual requirements
This is where custom code snippets become invaluable—they let you enhance specific blocks with exactly the functionality and styling you need.
Adding Custom Code Snippets with RiseOverride
RiseOverride makes it easy to add custom code snippets to any block in your Rise course. Here's how the process works:
Step 1: Install RiseOverride
Install the free RiseOverride Chrome extension to unlock custom code functionality in Rise.
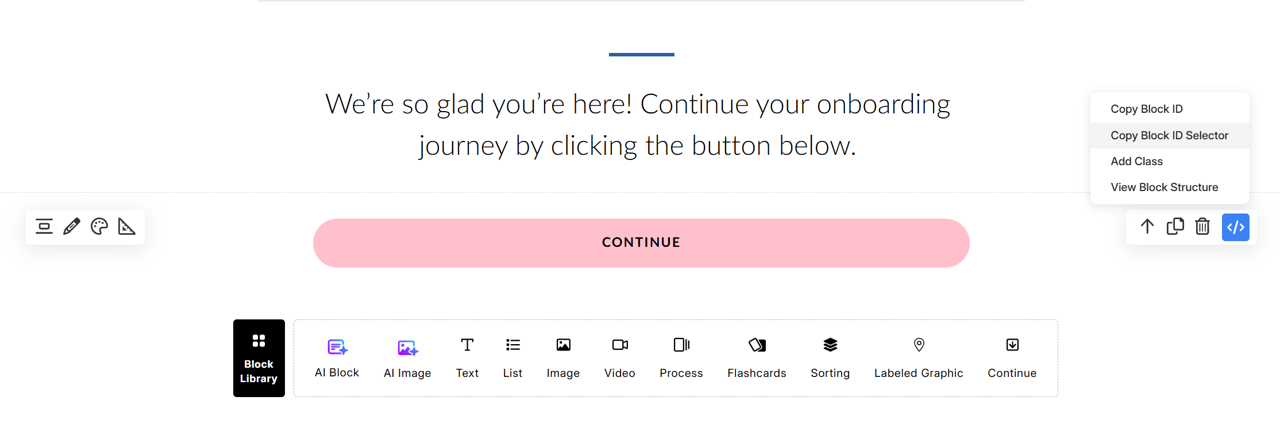
Step 2: Copy Block ID or Block ID Selector
In your Rise course, select the block you want to customize. RiseOverride provides built-in tools to easily copy the Block ID (data-block-id) or Block ID Selector of any element in your course.
Step 3: Write Your Custom Code
Use the copied Block ID to target that specific block with custom JavaScript or CSS. For example, if you copied a block ID, you can write code like this:
/* Target a specific block by its ID */
[data-block-id="your-block-id-here"] {
  background: linear-gradient(135deg, #667eea 0%, #764ba2 100%);
  border-radius: 12px;
  padding: 2rem;
  box-shadow: 0 8px 25px rgba(0, 0, 0, 0.1);
  transition: transform 0.3s ease;
}

/* Add hover effects */
[data-block-id="your-block-id-here"]:hover {
  transform: translateY(-5px);
  box-shadow: 0 15px 35px rgba(0, 0, 0, 0.2);
}
Real Examples of Custom Code in Action
Here are practical examples from our community showing how custom code snippets enhance Rise courses:
CSS Example: Pink Floating Button
This example shows how to style a Continue button with custom CSS. First, use RiseOverride's Copy Block ID Selector feature to easily copy the target block's ID, then apply this CSS:
/* Target your specific block using its ID */
[data-block-id="your-block-id-here"] .continue-btn {
  background-color: pink;
  color: black;
  border-radius: 50px;
  animation: floatY 2.5s ease-in-out infinite;
}

[data-block-id="your-block-id-here"] .continue-btn:hover {
  background-color: black;
  color: pink;
}

@keyframes floatY {
  0% { transform: translateY(0); }
  50% { transform: translateY(-12px); }
  100% { transform: translateY(0); }
}
This creates a playful pink button with a gentle floating animation that draws attention without being distracting. The Copy Block ID Selector feature makes it easy to target exactly the right block.
JavaScript Example: Confetti Effect
This interactive JavaScript example adds confetti effects to buttons in your Rise course. Credit to Mel's Tools for Rise for this creative enhancement:
(function() {
  let confettiLoaded = false;

  function loadConfetti(callback) {
    if (confettiLoaded && window.confetti) {
      callback();
      return;
    }

    if (window.confetti) {
      confettiLoaded = true;
      callback();
      return;
    }

    const script = document.createElement('script');
    script.src = 'https://cdn.jsdelivr.net/npm/canvas-confetti@1.9.2/dist/confetti.browser.min.js';
    script.onload = function() {
      confettiLoaded = true;
      callback();
    };
    script.onerror = function() {
      console.error('Failed to load canvas-confetti library');
    };
    document.head.appendChild(script);
  }

  function fireConfetti() {
    const triggerConfetti = () => {
      // Check for reduced motion preference
      const prefersReducedMotion = window.matchMedia('(prefers-reduced-motion: reduce)').matches;
      if (prefersReducedMotion) {
        console.log('Confetti disabled due to user motion preferences');
        return;
      }

      if (typeof confetti === 'function') {
        window.confetti({
          "particleCount": 100,
          "spread": 70,
          "startVelocity": 45,
          "gravity": 0.8,
          "scalar": 1,
          "colors": [
            "#FF6B6B",
            "#4ECDC4",
            "#45B7D1",
            "#FFA07A",
            "#98D8C8"
          ],
          "shapes": [
            "square",
            "circle"
          ],
          "origin": {
            "x": 0.5,
            "y": 0.5
          }
        });
      }
    };

    loadConfetti(triggerConfetti);
  }

  function attachConfettiEvents() {
    const blockId = 'your-block-id-here'.trim();
    if (!blockId) {
      console.error('Block ID cannot be empty');
      return false;
    }

    const targetBlock = document.querySelector('[data-block-id="' + blockId + '"]');
    if (!targetBlock) {
      return false;
    }

    const buttons = targetBlock.querySelectorAll('button');
    if (buttons.length === 0) {
      console.warn('No buttons found in Rise block:', blockId);
      return false;
    }

    buttons.forEach(button => {
      if (button.hasAttribute('data-confetti-attached')) {
        return;
      }

      button.setAttribute('data-confetti-attached', 'true');
      button.addEventListener('click', function() {
        fireConfetti();
      });
    });

    console.log('Confetti attached to', buttons.length, 'button(s) in Rise block:', blockId);
    return true;
  }

  // Wait for the target block to appear using MutationObserver
  const observer = new MutationObserver(() => {
    if (attachConfettiEvents()) {
      observer.disconnect();
    }
  });

  // Try to attach immediately in case the block is already loaded
  if (!attachConfettiEvents()) {
    // If immediate attachment failed, start observing
    observer.observe(document.body, { childList: true, subtree: true });
  }
})();
This script adds a delightful confetti effect when users click buttons in the targeted block. It's accessibility-friendly, respecting users' reduced motion preferences, and safely loads the required confetti library. Simply replace 'your-block-id-here' with the actual Block ID or Block ID Selector you copied using RiseOverride's Copy Block ID Selector.
Advanced Custom Code Techniques
With RiseOverride's Block ID targeting system, you can create sophisticated customizations that enhance the learning experience:
- Progressive disclosure: Show/hide content based on user interactions
- Custom animations: Add smooth transitions and visual effects to specific blocks
- Interactive elements: Create custom buttons, forms, and user interface components
- Dynamic content: Update block content based on user choices or progress
- Enhanced accessibility: Add custom ARIA labels and navigation aids
Best Practices for Custom Code in Rise
1. Use Specific Block Targeting
Always target specific blocks using their Block IDs rather than generic selectors. This ensures your code only affects the intended elements and doesn't interfere with other parts of your course.
2. Test on Different Devices
Make sure your custom code works well on desktop, tablet, and mobile devices. Use responsive CSS techniques and test JavaScript functionality across different screen sizes.
3. Keep Code Organized and Commented
Add clear comments to your code explaining what each section does. This makes it easier to maintain and modify your customizations later.
4. Start Simple and Build Up
Begin with basic styling changes before adding complex JavaScript interactions. Test each modification thoroughly before adding more functionality.
Common Use Cases for Custom Code in Rise
Brand Customization
Apply your organization's brand colors, fonts, and styling to specific blocks throughout your course to maintain visual consistency.
Enhanced Interactivity
Add custom click handlers, hover effects, and interactive elements that engage learners beyond standard Rise functionality.
Progress Tracking
Implement custom analytics and progress tracking for specific interactions within your course blocks.
Accessibility Improvements
Add custom ARIA labels, keyboard navigation, and other accessibility enhancements to ensure your course works for all learners.
Alternative Approaches to Custom Code
While RiseOverride provides the most seamless solution for adding custom code to Rise blocks, there are other approaches worth considering:
External Embedded Content
- iFrame embeds: Include external interactive content
- Third-party widgets: Embed specialized tools and applications
- Custom web pages: Link to externally hosted custom content
Rise Native Features
Maximize what's possible with standard Rise features before adding custom code. Sometimes creative use of built-in blocks can achieve your goals without any coding.
SCORM Package Modifications
For advanced users, modifying the published SCORM package can allow deeper customizations, though this requires more technical expertise.
Making Your Rise Courses More Engaging
Custom code snippets are just the beginning. To create truly engaging Rise courses with enhanced functionality:
- Start with specific blocks that need enhancement
- Use the built-in Block ID or Block ID Selector copy tool for accurate targeting
- Test your customizations across different devices and browsers
- Combine CSS styling with JavaScript interactivity for rich experiences
- Document your customizations or save them (Ctrl + S) for future reference and team collaboration
Get Started Today
Adding custom code snippets to your Articulate Rise courses doesn't have to be complicated or expensive. With RiseOverride, you can target any block in your course and enhance it with custom JavaScript and CSS in minutes.
Whether you're adding subtle styling improvements, creating interactive elements, or implementing custom functionality, the ability to target specific blocks with their Block IDs gives you precise control over your course customization.
Ready to enhance your Rise courses? Install RiseOverride for free and start adding custom code snippets to any block in your course. Use the built-in Block ID or Block ID Selector copy tool to target exactly the elements you want to customize—no guesswork required.